
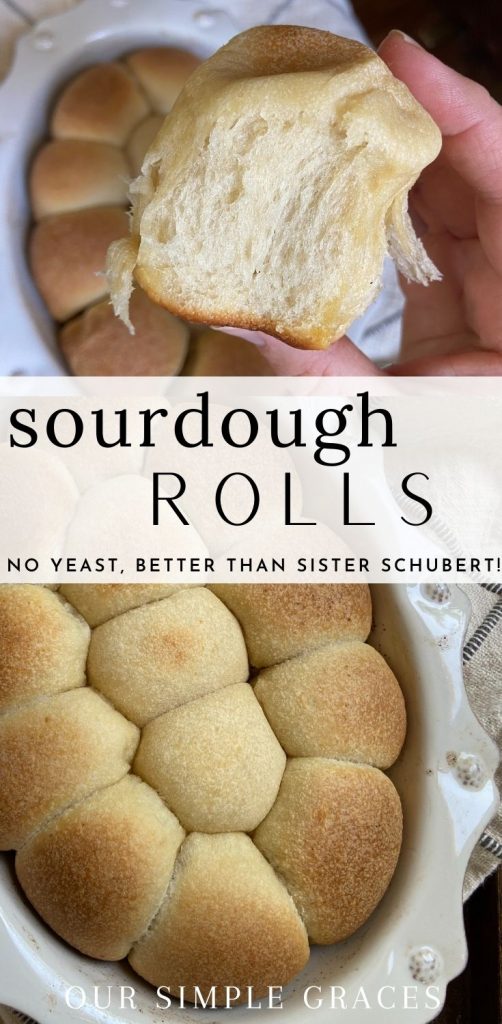
Light and fluffy, this sourdough rolls no yeast recipe is truly the best. These rolls are buttery and slightly sweet. They make the perfect dinner roll or mini sandwich bread.

If you grew up in the south, you surely know about Sister Schubert Parker House rolls. We had those at every family gathering and special dinner. Let me just tell you- these sourdough rolls are just as good as sister schubert… if not better.
After a quick google search, I was able to pull up the ingredients list for the original parker house rolls, and it contains way more ingredients than a roll should.. and while delicious, they are not doing your body any favors.
This recipe is just as delicious but made without the bad oils, commercial yeast and other extra additives made to extend shelf life of store-bought dinner rolls.
I first made these for our Easter celebration with friends and they were a hit! I had to test the recipe another few times to make sure it wasn’t a fluke, and y’all. It was not a fluke. This sourdough rolls recipe is a winner!
Serve these with a bowl of my hearty Beef Stew or Creamy Tuscan Kale and Sausage Soup or use them for sandwiches! You are going to love them.

Frequently Asked Questions:
Is Sourdough made without yeast?
Sourdough is made with water and unbleached flour. It uses the wild yeasts and bacteria caught in the air to ferment the wheat and does not use any commercially produced yeasts. Find out how to make your own sourdough starter here!
Is sourdough healthier than instant yeast?
Bread that is made from sourdough starter is much healthier than breads made with instant yeast. The sourdough starter captures the wild yeasts from its environment and digests the gluten during the fermentation process. Instant yeast is commercially manufactured and does not provide these same gut healthy benefits.
Why is sourdough bread good for you?
Sourdough breads require longer fermentation periods to allow the wild yeasts captured in your sourdough starter time to digest the flour and ferment the dough while it rises. Sourdough is lower in gluten than other breads made with commercial yeast, making it more easily digestible. Many people who do not tolerate gluten well can often eat sourdough bread without issues.
Sourdough bread that is long fermented breaks down the phytic acid in the wheat. Phytic acid is known as an anti-nutrient as it keeps our bodies from absorbing the vitamins found in wheat grains. Long-fermented sourdough bread actually makes the bread more nutritious and gives your body the ability to enjoy those wonderful nutrients!
Prebiotics are also found in sourdough bread, which help to feed the good bacteria in your gut. So many wonderful benefits to enjoying sourdough bread – and not just the taste, which is far better to yeast breads, in my opinion!
How do you store sourdough rolls?
My favorite way to store sourdough breads is by wrapping them in a tea towel or linen bread bag and storing in a bread box at room temperature. The bread stays fresh longer and does not dry out as it does on the counter.

Tools you may need for these Sourdough Rolls – no yeast recipe
- Stand Mixer with dough hook
- Rolling pin
- 2 inch Biscuit Cutter or Regular mouth mason jar lid
- Baking Dish
- Pastry Brush
How to make Sourdough Rolls – no yeast, just starter!
To make these sourdough rolls, you will need to begin by feeding your sourdough starter 4-6 hours prior to mixing the dough up. Allow your starter enough time to become active and bubbly and to double in height. Once it has doubled and is bubbly, it is ready for use.
You can make this dough in a stand mixer or by hand. I prefer the stand mixer method. It is a very sticky dough, so if you are mixing by hand, it will take a bit longer and the dough will be a little sticky to work with! Just a heads up if that is the method you choose to take.
Mix the Dough
Start by whisking the wet ingredients together – active sourdough starter, water, eggs and unsalted melted butter. Next, add in the flour, sugar and salt. Using the dough hook attachment for a stand mixer, mix together on medium speed for 5-10 minutes until the dough forms a smooth ball and does not stick to the edges of the bowl.
Bulk Rise
Once it is well combined and is not sticking to the sides of the bowl, cover the bowl with plastic wrap and leave it in a warm (not hot) spot. We keep our house at about 71-75℉ during the day, so room temperature works well for this bulk rise. This will usually take between 6-10 hours. You are looking for the dough to double and become less dense.

Fridge Fermentation
Once the dough has doubled, place the bowl into the refrigerator until you are ready to shape the rolls. Place in the fridge for a minimum of 4 hours and up to 2 days. Keep the dough covered and it can stay in the fridge for a few days until you are ready for to make the rolls. That is a wonderful option if you are making these for a holiday meal so you have less to prepare the day of.
Shape the Sourdough Rolls
About 3 hours before you are wanting to bake the rolls, take the dough out of the fridge and turn it out onto a floured surface. Roll the dough to about 1/2 inch thickness, keeping the surface and rolling pin floured to prevent sticking.

With a 2 inch biscuit cutter (or a regular mouth mason jar lid), cut out 22-24 pieces of dough. To shape the rolls, fold them into the center and then roll into a little dough ball.
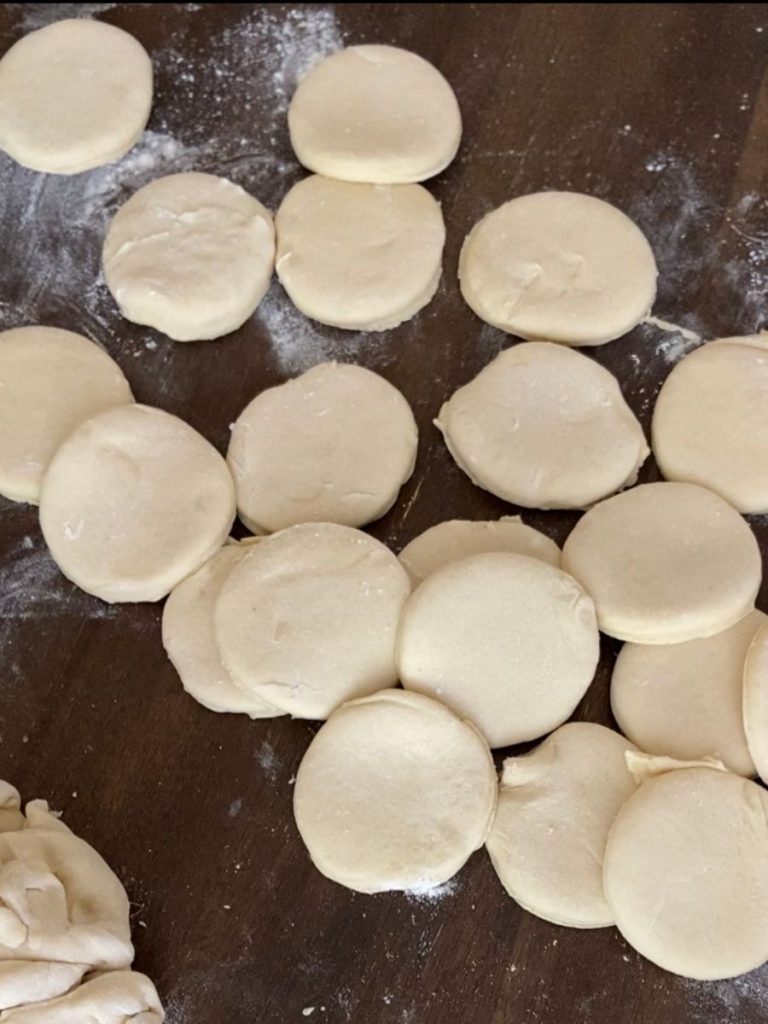
Place into a buttered baking dish – any kind will do, I have made these in a deep pie dishes, a 9×9 square dish, 9×13, you get the picture. Use what you want, just make sure to butter the dish. Place the rolled up dough balls in the baking dish and with a pastry brush, brush melted butter on top of the dough.

Rise & Bake
Let the dough rest in a warm spot for about 2 hours until the dough balls have doubled.
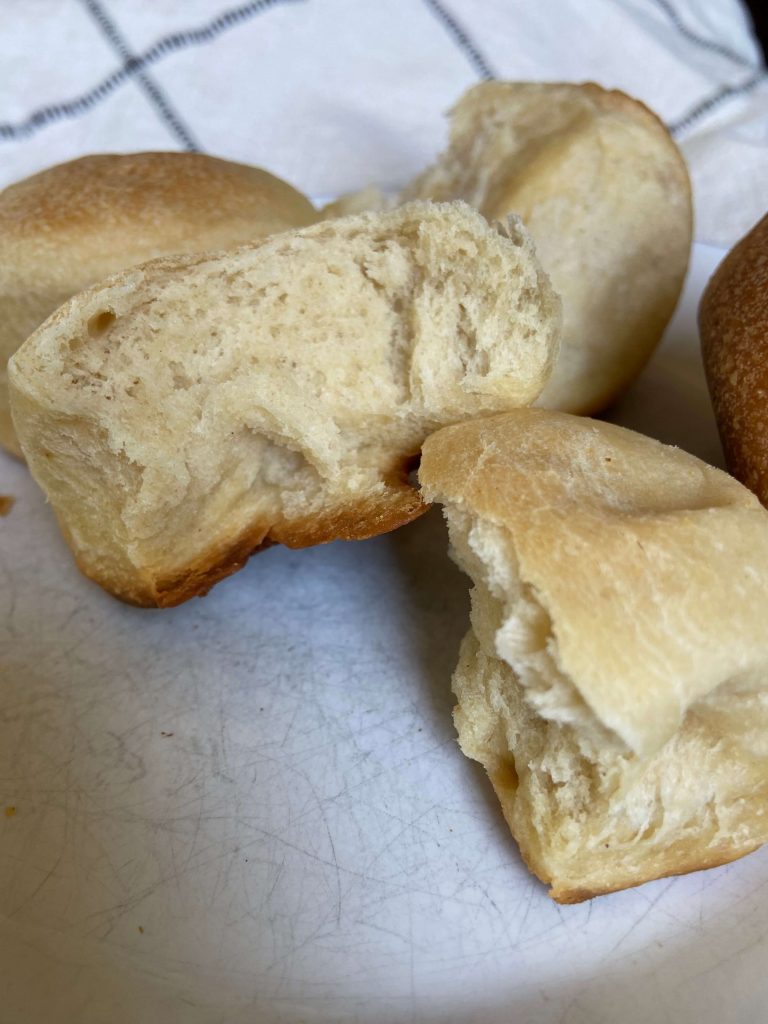
Once doubled, preheat the oven to 400℉ and bake for 20 minutes until the tops are golden.
Enjoy warm with softened butter or slice and use for mini sandwiches!
These sourdough rolls freeze well, too! Once they have cooled down after baking, place in a ziplock bag and store in the freezer. When you are ready to serve them, take them out and reheat in a 350℉ oven for 10 minutes.
If you try this recipe and love it, I would love to know! Come back and leave a review! Tag me on Instagram @oursimplegraces

Sourdough Rolls - no yeast!
Light and fluffy, this sourdough rolls no yeast recipe is truly the best. These rolls are buttery and slightly sweet. They make the perfect dinner roll or mini sandwich bread.
Ingredients
- 186 grams sourdough starter, active and bubbly
- 163 grams filtered water
- 2 Large eggs
- 100 grams unsalted butter, melted
- 563 grams unbleached all-purpose flour
- 100 grams cane sugar
- 10 grams salt
- 4 TBS unsalted butter, melted - for the baking dishes and brushing on top of rolls
Instructions
How to make Sourdough Rolls - no yeast, just starter!
To make these sourdough rolls, you will need to begin by feeding your sourdough starter 4-6 hours prior to mixing the dough up. Allow your starter enough time to become active and bubbly and to double in height. Once it has doubled and is bubbly, it is ready to be used.
Mix the Dough
Start by whisking the wet ingredients together - active sourdough starter, water, eggs and unsalted melted butter.
Next, add in the flour, sugar and salt. Using the dough hook attachment for a stand mixer, mix together on medium speed for 5-10 minutes until the dough forms a smooth ball and does not stick to the edges of the bowl.
Bulk Rise
Once it is well combined and is not sticking to the sides of the bowl, cover the bowl with plastic wrap and leave it in a warm (not hot) spot.
My house is kept at about 71-75℉ during the day, so room temperature works well for this bulk rise. This will usually take between 6-10 hours. You are looking for the dough to double and become less dense.
Fridge Fermentation
Once the dough has doubled, place the bowl into the refrigerator until you are ready to shape the rolls. Place in the fridge for a minimum of 4 hours and up to 2 days.
As long as the bowl is airtight with the plastic wrap or lid, it can stay in the fridge for a few days until you are ready for to make the rolls. That is a wonderful option if you are making these for a holiday meal so you have less to prepare the day of.
Shape the Sourdough Rolls
About 3 hours before you are wanting to bake the rolls, take the dough out of the fridge and turn it out onto a floured surface. Roll the dough to about 1/2 inch thickness, keeping the surface and rolling pin floured to prevent sticking.
With a 2 inch biscuit cutter (or a regular mouth mason jar lid), cut out 22-24 pieces of dough.
To shape the rolls, fold the edges into the center of the disc and then roll into a little dough ball. Place into a buttered baking dish.
I have made these in a deep pie dishes, a 9x9 square dish, 9x13, you get the picture. Use what you want, just make sure to butter the dish.
Place the rolled up dough balls in the baking dish and with a pastry brush, brush melted butter on top of the dough.
Rise & Bake
Let the dough rest in a warm spot for about 2 hours until the dough balls have doubled. Once doubled, preheat the oven to 400℉ and bake for 20 minutes until the tops are golden. Enjoy warm with softened butter or slice and use for mini sandwiches!
Notes
- This dough can be made in a stand mixer or by hand, but I prefer the stand mixer method. It is a very sticky dough, so if you are mixing by hand, it will take a bit longer and the dough will be a little sticky to work with! Just a heads up if that is the method you choose to take.
- These sourdough rolls freeze well! Once they have cooled down after baking, place in a ziplock bag and store in the freezer. When you are ready to serve them, take them out and reheat in a 350℉ oven for 10 minutes.
Recommended Products
As an Amazon Associate and member of other affiliate programs, I earn from qualifying purchases.


Nutrition Information:
Yield: 24 Serving Size: 1Amount Per Serving: Calories: 171Total Fat: 6gSaturated Fat: 3gTrans Fat: 0gUnsaturated Fat: 2gCholesterol: 30mgSodium: 175mgCarbohydrates: 26gFiber: 1gSugar: 4gProtein: 4g
These look so yummy! We have been making sourdough bread for a while, but would definitely love to branch out and try these. Thanks for sharing!
So I’m going to go ahead and assume that you don’t add the melted unsalted butter with the wet ingredients and save it for the dish and brushing on top…..
Your recipe says it’s for the baking dish and to brush on top of the rolls but also says to mix it in with the wet ingredients.
The 100 grams of butter goes in with the dough initially, then 4 TBS for buttering the dish and brushing on top. Hope that helps!
Nevermind….I read it wrong.
I’ve been looking for a great roll recipe..how’d you know?! I can’t wait to try this!
Do you have a workaround for someone that doesn’t have a mixer and is doing it by hand?
Hi! Yes, definitely possible to do by hand. Mix the wet ingredients first with a whisk, and then if you have a dough whisk, add the flour and butter to combine, or just use your hands. It will be a shaggy dough, so then you will just knead the dough on the counter for a few minutes till it comes together and is smooth!
I was wondering if you could make bread loaf out of this
I have never tried making a bread loaf with these but I don’t see why not! Let me know if you give it a try! I do have a sandwich loaf recipe if you are looking for that 🙂
Woohoo, made it into loaf…it turned out great! I baked it at 350 for 30 mins. Thank you for another great recipe. The rolls are always a family favorite ❣️
Okay awesome!! I’m gonna have to try this! Glad it turned out well 🙂 thanks for sharing!
This is an easy, delicious roll recipe; 5 stars! I was looking for a recipe without extra yeast (using only fed sourdough starter) and one that I could “long ferment” as my son’s stomach feels better without gluten. My husband and son REALLY liked these rolls. Thank you.
That’s great!! So glad y’all enjoyed them 🙂 thank you for sharing!
Can I cut this recipe in half? I only need about 12 rolls not 22.
Yes you definitely can half it 🙂 the rolls I made are small, so you could also just leave the recipe as is and make larger ones. Just another option.
Thank you!! I went ahead and made as instructed, but my dough was very very dense and didn’t rise much. I know it wasn’t the starter as I made a loaf of sourdough at the same time and it was great. Starter had been fed, tested and was ready! I’m curious if it was maybe the type of flour I used? I used stone ground all purpose flour I get from a local farm and am wondering if maybe I need to adjust the amount I use?
Oh interesting! Sorry to hear it was dense for you. It could have just needed more rise time, if the temperature in the house was not super warm it will take longer too.
Those rolls look AMAZING! Can’t wait to try them!
I’m going to see how this recipe comes together using the dough setting in my bread machine! Thank you for sharing the recipe.
Great idea! I hope you love it!! 🙂
It worked wonderfully in the bread machine on the dough setting. I just threw all of the ingredients in & let it do the first rise in the machine. My family said this is the best sourdough recipe I’ve tried to date! Thanks for sharing!
I’m so glad to hear everyone enjoyed it and the bread machine worked out!! Thanks for trying the recipe! 🙂
In the middle of prepping … so interesting … I know the anser will be too late for this batch but for the future … May I use half and leave half in regrigerator for another couple of days?
+Peace!
+
Hi! Yes you can absolutely do that! A great way to have fresh rolls again soon 🙂 just make sure they are covered well in the fridge so they don’t dry out. Enjoy!
Tried these buns and they taste really good, but mine were a little dense. After I formed the balls of dough and put them in baking dish, they didn’t rise too much and I let them sit for 6 hours. The room wasn’t too cool, but next time I may have to let them rise longer. Overall great recipe, thanks.
Sorry they were a little dense, but glad you still enjoyed them! Thanks for trying the recipe! 🙂
These were amazing! My first recipe I’ve made using my starter.
Measurement notes for when I make in the future:
186g starter = 3/4 cup
163g water = 2/3 cup
100g butter = 1/2 cup
563g flour = 4.5 cups
100g sugar = 1/2 cup
10g salt = 2tsp
Hi, I’m new to sour dough. Do you stretch and fold this recipe or not? I’m in the bulk rise and you might see this to late but I am unsure for dinner rolls if it different then artisain bread. Thanks
Hi! You can stretch and fold the dough if you are doing it by hand, but if using a mixer you don’t need to stretch and fold. Hope that helps!
I’ve no idea what I did wrong with this recipe as mine were a complete failure. They hardly rose, so weee obv too dense, but they also had a ridiculously strong sourness to them. Ah well!
Hi Vicky! Sorry it didn’t turn out! This usually happens to me if the starter is not at its peak when I mix up the dough. Thanks for giving it a try! 🙂
Can these be frozen to be baked a later time?
Can these be frozen to be baked a later time? Also, if so, would I freeze them after the first rise before shaping them or would I freeze them after shaping them?
Yes they definitely can be frozen. I would either bake them most of the way and then freeze, finish baking them when you are ready to serve. Or you could freeze after shaping them. You would just want to let them rise a little and then freeze so you could bake from frozen.
Great! Thank you!
I cannot get an accurate measurement for 186 grams of active starter to cups. I keep getting conflicting info. Do you know the measurement for starter to cups? What I’m reading is it’s not a typical conversion.
Yes it it can vary which is why I prefer measuring by weight, but I would say 1 Cup of active starter would be around the same!
Can the rolls be formed after the bulk ferment, then left in the fridge overnight with the final proof and bake the next morning?
Yes! That is a great option. You will want to let the rolls come to room temp and finish rising before you bake.
I stuck to the recipe and recommendations and the rolls were perfection! My gluten sensitive sister could even enjoy them. Thanks for sharing!
I am so glad to hear you all enjoyed them! And that’s amazing she was able to enjoy them as well 🙂 Thank you for trying the recipe!
Thanks so much for sharing. I started them yesterday and baked them today. They are my new favorite. They turned out perfectly.
Oh yay! You are welcome, so glad you enjoyed them 🙂
These are amazing! My family loves them. New to sourdough and I e already made them 3 times. We freeze them individually and pull out a few each night for dinner. Thank you for this recipe!
That’s a great idea! We like to freeze them, too! So glad y’all are enjoying them:)
Out of curiosity, what do you do with the leftover edges after using a cutter to form the rolls? I’m new to sourdough and hate for it to go to waste. Is it possible to cut into squares so there’s no waste? I’m afraid if I put them together they might me handled too much? Am I overthinking it? I’m really good at that. ????
Hi! I do actually just roll them back up together, roll them out and make rolls out of the extra dough! I haven’t had an issue with over working the dough 🙂
You’re awesome for being so responsive! Good to know, thank you! One more question as I’m going to attempt these today. Could brown or granulated sugar be subbed for cane sugar?
No problem! Granulated will work great. I have not tried brown sugar so that may change the taste slightly but I’m sure it would still be good!
Just wondering what happens if it overmixes in the mixer? I set the timer for 5 minutes and when I looked at it about 2 minutes later it seemed to be forming nicely. Then when the timer went off I went back and the dough was no longer firm. I took it out of the mixer bowl and decided to let it bulk rise. My plan was to fold it a few times to see if it helps, but I was wondering if it could be overmixed? Any suggestions? Thanks for sharing your recipe!
Hi! I think it should still be fine. I would just let it bulk rise and if you need to refrigerate for a bit before shaping that will help make it more workable. I’m sure they will be great!
Yes! I let it rise for a longer period and it looks amazing. Now into the frig 🙂 Thanks so much. Excited to make these tomorrow.
Can I skip the sugar?
I would maybe try replacing with honey or reducing amount of sugar. It will change the rolls if you completely omit it.
I have made this recipe several times and I love it! I was wondering how long can the dough stay in the refrigerator before it will go bad? Exactly how many days would you recommend?
I would probably bake within 3 days if refrigerated
How are these food safe? It seems like the raw egg shouldn’t sit out at room temperature for that long during the bulk fermentation. I could be wrong so forgive me if I am.
Typically enriched dough (dough with extra additions, like eggs, oil, milk etc) is considered safe to ferment at the room temp. If you feel uncomfortable leaving it to bulk ferment altogether you can add those after the bulk fermentation, but I haven’t made it that way.
Made these this morning and nom nom! So good with softened butter.
I’m making wasabi salmon egg salad for lunch and mini sandwiches with these rolls (if we don’t eat them all first!) I’m making a second batch to make turkey, mashed potatoes and gravy sandwiches from the leftovers from Thursday to pass out to some unhoused friends in the area.
I’m a newbie. Made my first loaf of sourdough on Thursday morning for dinner. Wasn’t a crumb left.